
Microstock agency Dreamstime have released a new WordPress plugin which makes it easy for bloggers to insert photographs and graphics directly in to their blog posts. This is instead of having to visit Dreamstime first, download the file and then upload them to WordPress.
Here I have written my review of the plugin, and how you too can install it and start using it immediately.
Review
I have installed the plugin and started using it. In fact the first post I used it on was this one, and the image you see here was inserted like that using the plugin. No reason for choosing a dog, I just thought it was a really nice photograph, a good example to show, plus I love dogs!
Installing the plugin was very simple, no different to installing other plugins, and with this there was no lengthy setup process. Simply enter account details and away you go. To use the plugin is also very simple. Can’t go far wrong when you only have to search for what you want and then insert it.
Since using the plugin I haven’t experienced any kind of bugs or glitches which is good to see. One thing I would prefer is slightly more search functionality. You can’t specify type of content such as ‘photos’, ‘illustrations’, ‘videos’ or ‘all content’. I use a mix of file types so for me it would be nice to be able to specify that. There also isn’t the other options such as ‘Exclusive’ photos and turning on and off the filter. These limitations may mean using the full website will sometimes be necessary.
Overall the plugin is very good and will certainly be a time saver. So I would recommend it to bloggers who regularly use images (which is pretty much all of us!). Read on below if you would like to install it on your WordPress blog.
How-To Guide for Installing and Using the Plugin
Here is a quick step-by-step guide to installing the plugin and inserting an image with it.
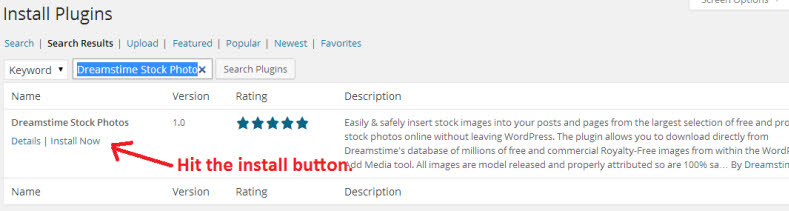
1) Install the plugin by going to the ‘Plugins’ section of your WordPress installation. Click on ‘Add New’ and search for ‘Dreamstime Stock Photos’. Then click the ‘Install Now’ option and once installed click ‘Activate Plugin’.
2) Once that is done you then need to go to either edit an existing post, or start a new one.
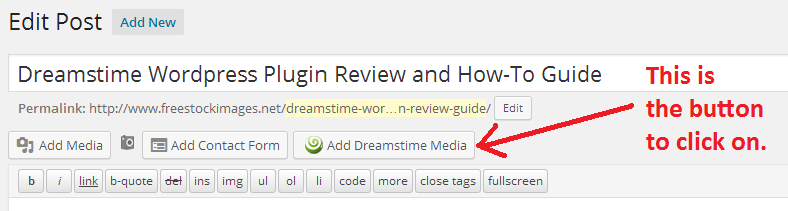
3) When you are ready to insert an image click the ‘Add Dreamstime Media’ button as you can see in this screenshot.
4) Before you can use any images you will need to login to your Dreamstime account. Simply click the ‘My Account’ button and enter your username and password. If you don’t yet have one you can create one for free.

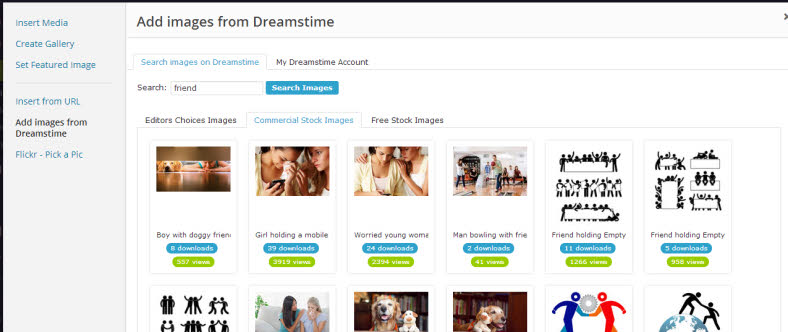
5) Then search for what you want an image of, or you can look at the editors choice if you are unsure of the sort of photo to use. Search results look like this. You then click on the one you are interested in.
6) Once you have found what you want you then choose the size (if it is a paid for photograph), the bigger the size the more credits it will cost. Or if it is one of the free images simply click the ‘download’ button as they are always one size. It will then import the information where you can add a description, change the caption and choose dimensions, the one I used at the top of this post was ‘thumbnail’ size. Then you simply hit the ‘Insert into post’ button and in it goes.
If you need help with the plugin you can try the WordPress.org listing to ask for support or alternatively you could try directly on the Dreamstime website either on their forum or by contacting support.
This plugin is free, gives a good choice of images to choose from, some free and some paid-for, and will certainly save time. Well worth using.